10 minutes

Sunset Bunny Bowl

Hi everyone, I hope you had a fantastic bunny day yesterday!

Motivation Monday: “You don’t get what you wish for, you get what you work for.”

Obvi my favorite holiday since I was a little tike… haha Bun and a bun!

Easter Throwback
This bun is in bunny heaven!Bunny Heaven
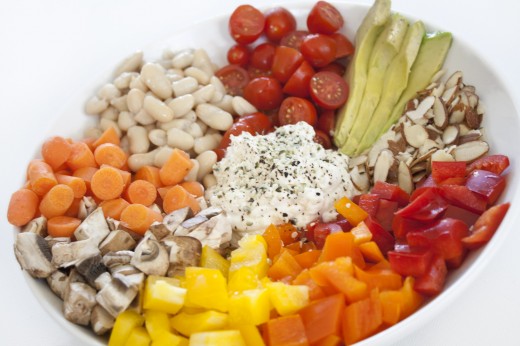
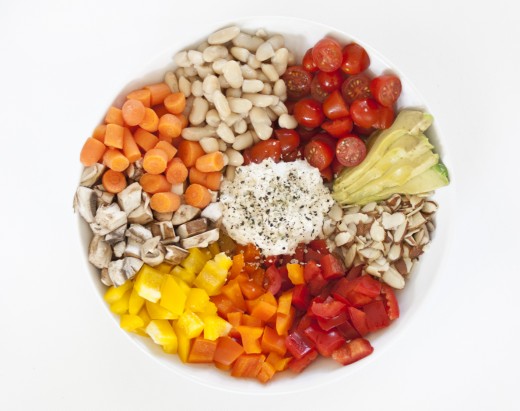
Since I’m sure most of us ate our weight in Easter candy and… plug your ears… chocolate bunnies, NO! A Tragedy! It’s time for a little Easter detox. This Bunny Bowl was inspired by a photograph on Chobani’s Instagram. After seeing the photo, it was all I could think about, so I headed to the grocery store for some fresh ingredients to make a similar concoction. After a very long deliberation on what this delectable bowl should be named, I ended up going with “Sunset Bunny Bowl” which was reader Julie Scott’s idea! Please note that my awesome recipe names were vetoed: Rainbow Bunny Bowl, Chop Chop Bunny Bowl, and Veggie Nom Nom Bowl. April Fools on the last one haha. I thought those named were suh-weeeet, but apparently not so much! Easter Detox Bowl was a close second, but this “salad” if you will, can be made ANY day!

This colorful bowl is filled with protein, fiber, and micronutrients. It’s the perfect lunch for a warm day! Don’t forget healthy food should be pretty, we eat with our eyes! Pretty food= delish food!

Sunset Bunny Bowl

Sunset Bunny Bowl
Sunset Bunny Bowl
Serves 1

1/3 cup red bell pepper
1/3 cup orange bell pepper
1/3 cup yellow bell pepper
1/3 cup mushrooms
1/3 cup tomatoes
1/3 cup carrots
1/4 medium avocado
1/4 cup white cannellini beans
1/4 cup plain 0% Chobani Greek yogurt
2 Tbsp sliced almonds
Salt, pepper, & lemon juice to taste

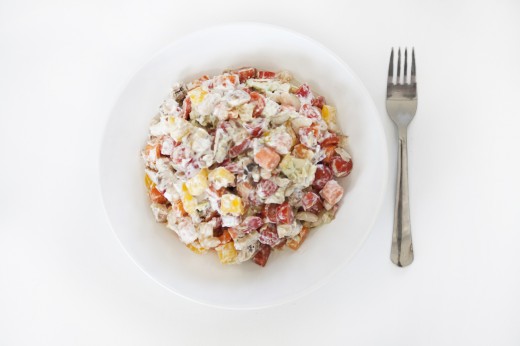
Wash and chop produce into small pieces. Rinse and strain cannellini beans. Arrange chopped produce, beans, avocado, and almonds in a bowl and top with Chobani Greek yogurt. Add salt, pepper, and a fresh squeeze of lemon juice to taste. Toss, and enjoy cold.
Note: I used canned low-sodium cannellini beans

Greek yogurty goodness:

Sunset Bunny Bowl
Sunset Bunny Bowl
The Rabbit Food Pyramid Breakdown
Produce: bell peppers, mushrooms, tomatoes, carrots
Whole Grain: none
Protein: cannellini beans and 0% Greek yogurt
Plant Based Fat: almonds and avocado

DIY Recycled Gift Bow

A couple of weeks ago I posted a picture of my famous newspaper gift wrapping and bow on Instagram and a few of you wanted a tutorial, so here is it! Although this isn’t a Fashion Friday DIY, and it has nothing to do with health or fitness… I did use Fitness Magazine as my bow material and the Sports section of the Los Angeles Times for my Wrapping! Plus, I just love DIYs and it’s still something fun and easy to make! I cannot tell you how many times I was wrapping paper-less in college. It seemed like every week was someone’s birthday, and I needed a makeshift gift wrap that didn’t look like it was thrown in a Trader Joe’s grocery bag, although I have done some sweet wrapping with those bags! The possibilities of recycled gift bows and wrapping are endless from magazines, newspaper, maps, photos, and posters. Whatever you decide to use, you can make some gorgeous eco-friendly custom wrapping!


DIY Recycled Gift Bow
Makes 1 cute bow

1 magazine page
1 ruler
1 pen
1 pair of scissors
1 stapler
1 roll of tape
10 minutes


1. Select one magazine page for your bow. It can be random or based on color, pattern, etc.
2. Carefully remove your selected page from the magazine.
3. With a ruler and pen, measure and mark the magazine page into 9 strips that are 3/4 inch each. The last “leftover” strip will be a little wider than 3/4 inch, this is ok.
4. Cut each strip in a straight line.
5. Leave the first 3 strips full size. Remove 1 inch off of the top of the next 3 strips. Remove 2 inches off of the top of the next three strips. Cut the remaining strip so that it is 3 1/2 inches in height.
6. Take one strip (with the color you want to show on the outside) and loop one end to the center, at a diagonal so a “ribbon” shape is formed.
7. Loop the remaining end so that the strip resembles a figure eight and secure it with a staple.
8. Follow steps 6 and 7 with each of the strips and keep them in size order. Take the 3 1/2 inch single strip and form it into a loop and staple or tape the ends together.
9. Take the first set of same sized figure eights and arrange them into a flower shape and secure them together with a  staple.
10.  Follow step 9 with the next 2 sets of figure eights.
11. Place each flower on top of each other and secure with a rolled piece of tape; largest on the bottom and smallest on the top.
12. Finish your bow by filling the center in with the remaining loop. Secure the loop with a rolled piece of tape.

Optional: Wrap your gift in newspaper or matching magazine pages, enjoy!
Custom Cards: I love making cards out of Crossword Puzzles from newspaper and magazines. You can try to fill the spaces with a note to your gift recipient! 

DIY Multi-Strand Scarf


I am a huge fan on no-sew projects from recycled clothing. If you were a fan of my no-sew DIY Workout Shirt, you will enjoy this one as well. Plus they will look très chic when worn together! Behold, a scarf that is perfectly lightweight and easy-to-wear to your Yoga or Bar Method class and stylish enough for running errands around town!
Oh, and did I mention there is no sewing required?!

DIY Multi-Strand Scarf
Makes one stylish scarf

Ingredients:
1 old T-shirt (the bigger the better)
1 pair of scissors
1 ruler
10 minutes


1. Start with a large T-shirt. Any old shirt will do! Seamless is a plus!

2. Cut off the bottom hem of the shirt. Then cut 1in – 2in wide strips horizontally across the shirt from bottom to armpit. You can cut as many strips as you would like (I liked my thick strips the most). The more strips, the more strands your scarf will have. You can use a ruler to guide a straight line across the shirt, but don’t worry if they aren’t perfect.

3. Set the bottom hem aside. Stretch all of the remaining strips until they become long, and the raw edges start to roll inwards.

4. Cut one end of the bottom hemline so it becomes a string.

5. Using the strip of bottom hemline, knot it around the strands to secure them in place.

6. Wrap the strip a few inches around the center of the scarf, and back over to meet the other ends. Knot the ends together tightly.

7.  Trim the loose ends and tuck the knot underneath the wrapped fabric.

Viola, a stylish scarf to wear to yoga! Wear it long or bundle it up, it’s super fun and easy-to-wear!
Post or email your photos if you make a scarf! I can’t wait to see your creations!