Thanksgiving Leftovers Sandwich

Vegan-Thanksgiving-Leftovers-Sandwich-Sweet-Potato-Buns-10Vegan-Thanksgiving-Leftovers-Sandwich-Sweet-Potato-Buns-1Vegan-Thanksgiving-Leftovers-Sandwich-Sweet-Potato-Buns-2 Vegan-Thanksgiving-Leftovers-Sandwich-Sweet-Potato-Buns-3 Vegan-Thanksgiving-Leftovers-Sandwich-Sweet-Potato-Buns-4Vegan-Thanksgiving-Leftovers-Sandwich-Sweet-Potato-Buns-6 Vegan-Thanksgiving-Leftovers-Sandwich-Sweet-Potato-Buns-7 Vegan-Thanksgiving-Leftovers-Sandwich-Sweet-Potato-Buns-8 Vegan-Thanksgiving-Leftovers-Sandwich-Sweet-Potato-Buns-9
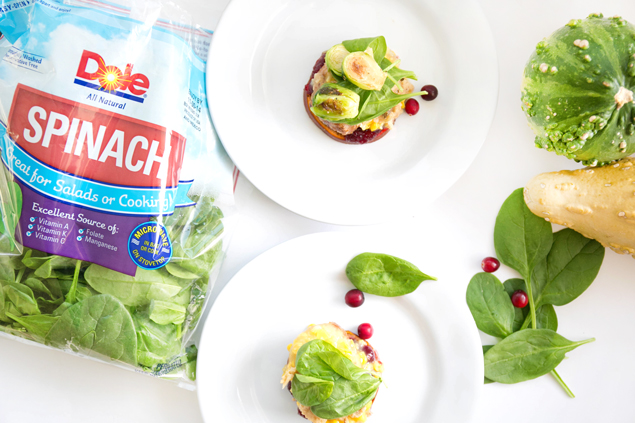
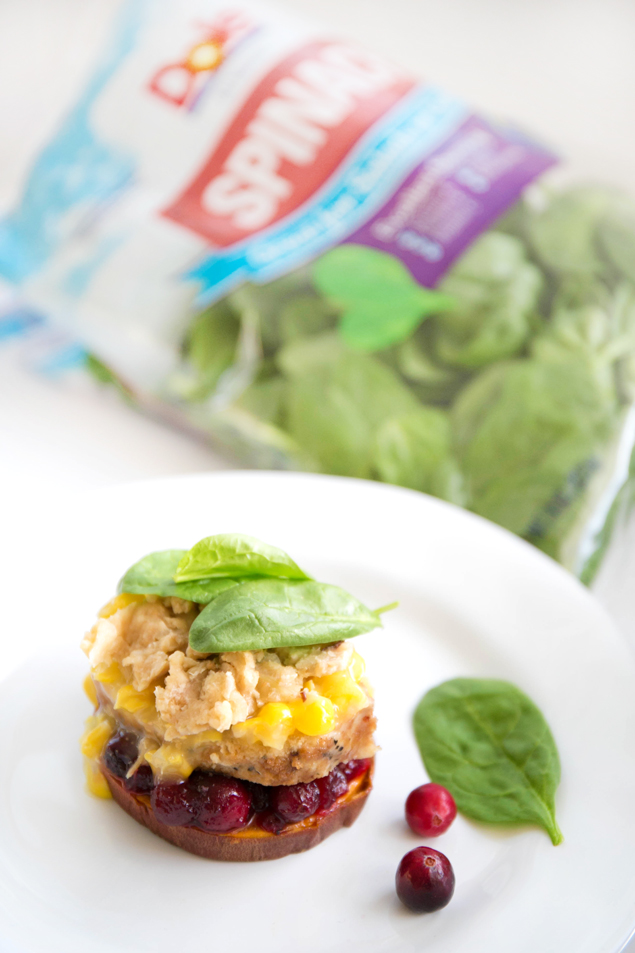
This Thanksgiving, Dole and I are encouraging families and individuals to include greens in their meals! We know that Thanksgiving can be a hard holiday to eat healthy for, but with a few little swaps and the addition of fresh Dole greens, it can be done!

I was completely stumped while trying to think of a healthy Thanksgiving recipe until I saw my friends Taryn and Julia the other day. I asked them, what is a dish that gets left out during Thanksgiving? Something uncommon. That’s when it hit us as we were all talking – there’s plenty of delicious side dishes for Thanksgiving, but there also tons of leftovers, and not much to do with them – except for eat the same meal over and over again for an entire week. I’ve surprisingly never made a sandwich out of leftover Thanksgiving food, but I am alllllll over it this year!

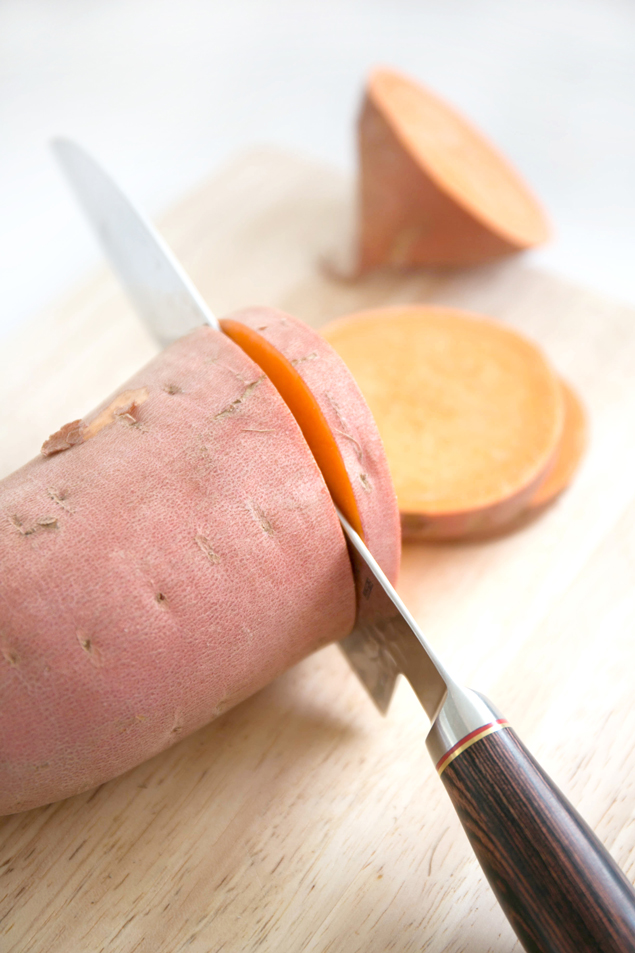
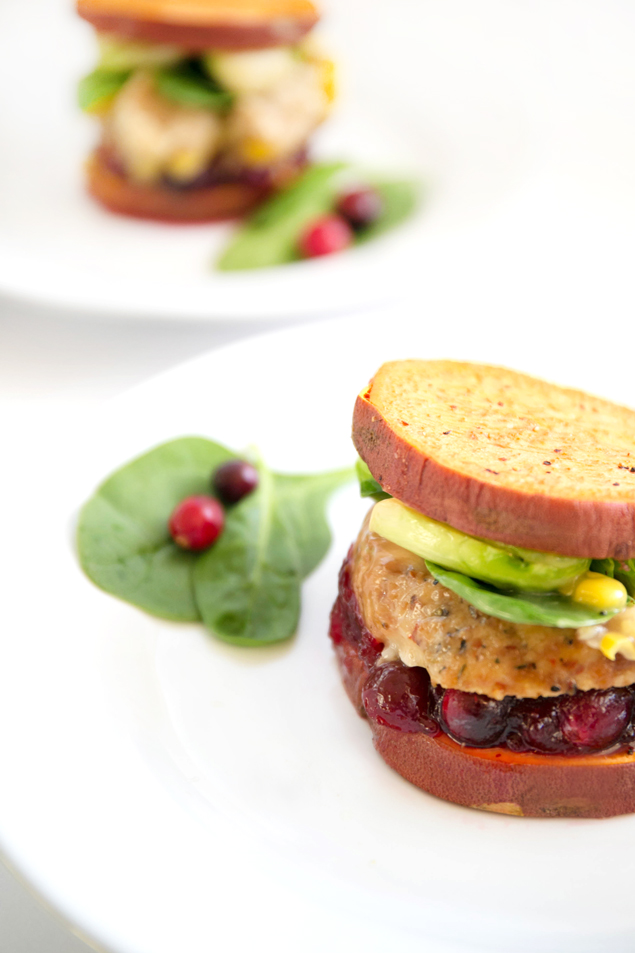
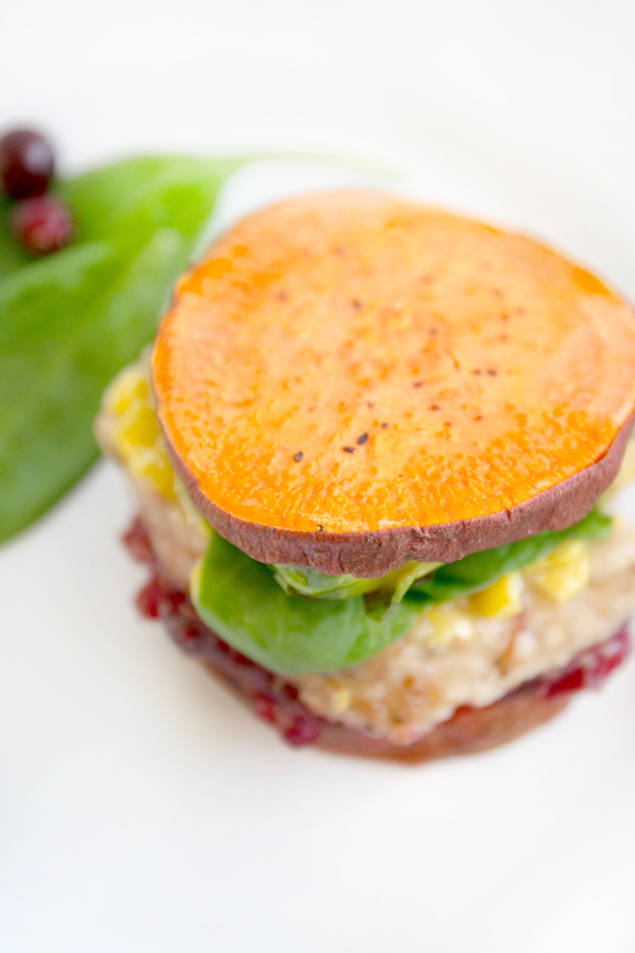
Since most Thanksgiving leftovers are pretty rich, I added some fresh Dole Spinach and my new favorite type of “bun” to my Thanksgiving sammy! I just recently discovered sweet potato buns, and I seriously wish I knew about them sooner. When baked with olive oil, they taste amazing as a bread or bun replacement, plus they’re loaded with beta-Carotene which is excellent for vision.

Sweet Potato Buns

The biggest (widest) sweet potatoes you can find.
Olive oil
Salt & Pepper

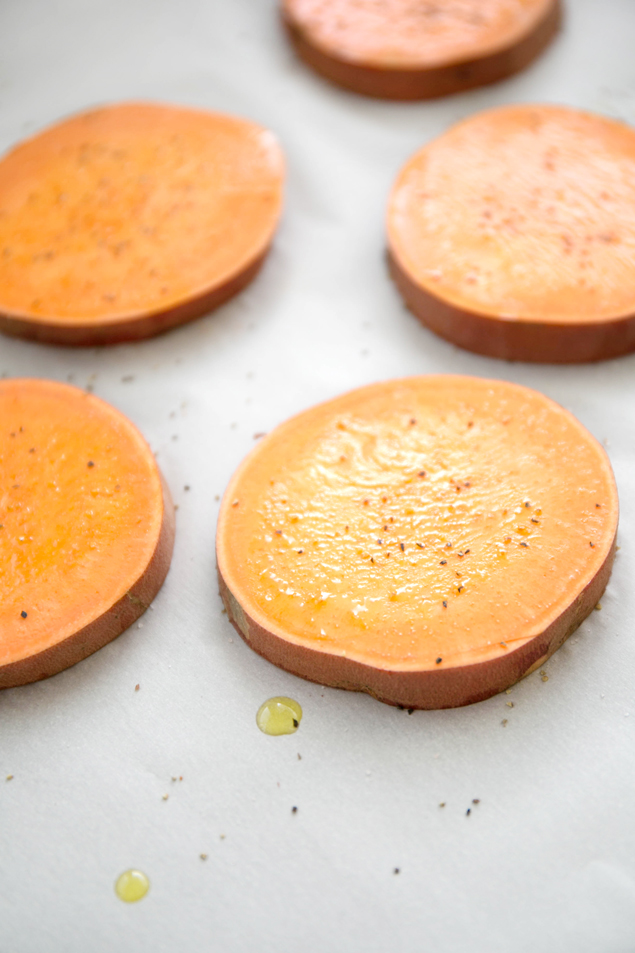
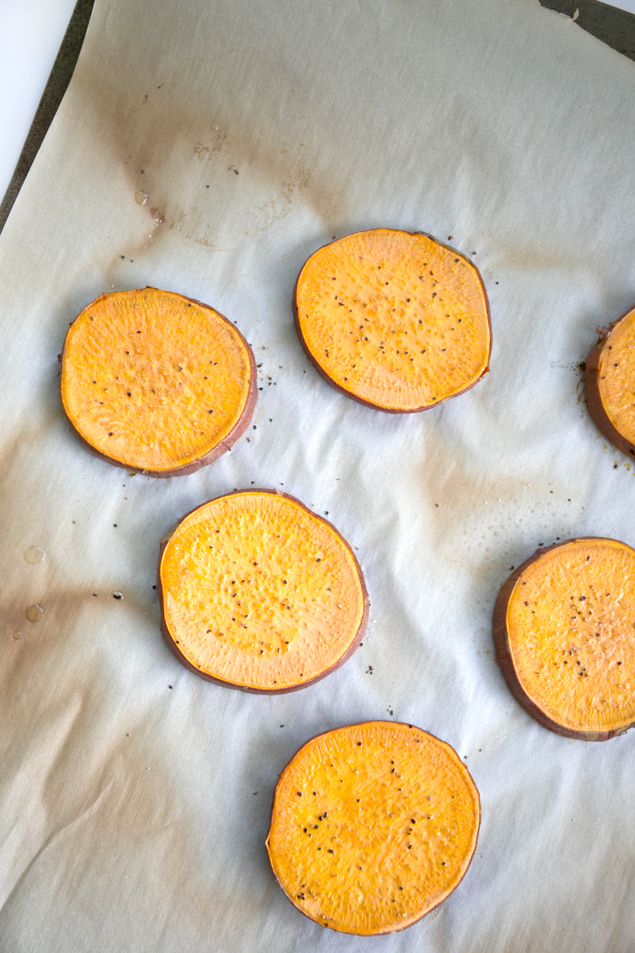
Preheat oven to 400 degrees. Slice sweet potato into 1/2 inch or 1/4 inch thick slices. Coat both sides with olive oil and sprinkle with salt and pepper. Place the sweet potato rounds on a baking sheet lined with parchment paper and bake for 20-30 minutes. Flip the sweet potatoes halfway through baking.

Leftovers Sandwich Ingredient Ideas

Dole fresh spinach or sautéed spinach
Tofu Turkey (or regular turkey)
Cranberry sauce
Creamed corn
Roasted Brussels Sprouts
Gravy
Green beans
Stuffing

I hope you have a happy & healthy Thanksgiving with your family and friends!
xo-Catherine

For more healthy thanksgiving recipes, check out Dole’s Butternut Squash with Eggplant-Pomegranate Sauce, Caramelized Pear, Roasted Tomato and Lentil SaladVegetable & Kale Au Gratin, and Roast Turkey Salad with Cranberry Vinaigrette.

a Rafflecopter giveaway
*Must use a valid email address to enter. Must be a US resident to enter. Giveaway ends on Wednesday, November 26th at 11:59 PM (PST).
1 winner will be randomly selected and announced on Thursday, November 27th.

This post has been sponsored by Dole. I received compensation for this post. All opinions are my own.

Blog Makeover!

I am sooooo excited, and so exhausted! It’s 5:00am here in California and I still haven’t gone to sleep! I’ve been up late the past few nights working hard on completely redesigning and programing my blog. It’s been almost 3 years since my blog has gotten any sort of update, so I went all out on this one! It has literally been years since I’ve gone this deep into coding. I totally feel like I’m reliving my college days in the studio pulling all-nighters before graphic design final presentations. It makes me miss my old roommates & college friends, and my good friend Ryan! Shout out to my FIDM & Art Center Alum “GD-ers” and anyone else out there who’s still awake working on school work!

Rabbit Food For My Bunny Teeth New Blog DesignSocks: Urban Outfitters  |  Bedding: Anthropologie

ABOUT THE MAKEOVER //

New Navigation // simple and easy to use
I cannot tell you how much my old nav bar bothered me. It looked so stale. Like an old school Macintosh circa 1995 or something. I’m so happy that it’s pretty and sleek now!

Fancy Schmancy Slideshow // so. much. yes.
I’m obsessed with this element. Once I got it installed I was so overwhelmed that I couldn’t even decide what images to feature, so these are probably temporary. I’m so excited to feature new posts and revive some oldies but goodies with this feature!

Cleaned Up Side Bar // so fresh and so clean cleannnnn
My right side bar was kind of a mess to be honest. I’m a very minimalist designer, and that side bar was getting out of control. I’ve customized the sidebar with some fun new features to organize my sponsors and other goodies on the right.

Organized Comment Section // …finallyyyyyyy!
I seriously despised my old comment sections below posts! It was so confusing and hard to read. Even when I would read comments, I would be unsure of whose comment was whose and if I was responding to the correct person. Well, that problem has been solved! The organization is so much better and the replies are much easier to read. Yay!

Black & White Everything // goodbye bunny cookie background
I’ve finally parted ways with my Annie’s Organic Bunny Cookies ombre background that I created in 2012. As much as I loved it, it was time for a new look. It’s still featured on my twitter and shop background for the time being. I just could’t handle more change in one week! I LOVE black and white, and think it brings more attention to my photography (which has been getting so much better over the years, holy guacamole!)!

Undecided Changes // hmmmmm
I removed the “link within” widget (it shows you similar posts below each post), but sometimes I think it looks too busy, so I’m wavering on bringing it back or not. I know it’s definitely useful for new readers. I can’t decide!

There’s still a few little things that I want to chance and switch around, but overall I’m so excited about the new look! I think it fits my design aesthetic a little more and looks so much cleaner. Plus it’s easier to navigate and focus on. I want to start adding some more lifestyle posts to my blog as well as more DIYs! I love food, but sometimes I need to change it up just to remain sane! Definitely expect more healthy recipes, DIYs, and maybe some hair tutorials coming soon!

If you see anything funky or have any suggestions, don’t hesitate to let me know what you think in the comments below!

Health & Happiness
xo-CatherineP.S. If you have ever been to a barre class (especially Pure Barre) this article is the funniest thing I’ve read all week! It’s a barre class review as told by a dude – it’s on point and so hysterical! {WARNING: profanity, and lots of it!}

ASICS GEL-Kayano 21 Review

This post has been sponsored by ASICS and I have been provided with a complimentary pair of shoes. All opinions are my own.

ASICS-GEL-Kayano-21-Review-12ASICS-GEL-Kayano-21-Review-9ASICS-GEL-Kayano-21-Review-5ASICS-GEL-Kayano-21-Review-3ASICS-GEL-Kayano-21-Review-2ASICS-GEL-Kayano-21-Review-1ASICS-GEL-Kayano-21-Review-4ASICS-GEL-Kayano-21-Review-6ASICS-GEL-Kayano-21-Review-8ASICS-GEL-Kayano-21-Review-7

ASICS recently released the GEL-Kayano 21, which  is the lightest version of the Kayano yet and features the latest in ASICS technical innovation.

I’ve been wearing the Kayano since I ran on my high school’s cross country team in 2005. So when ASICS reached out to me about the release of the Kayano 21, I had to get my hands on them! For such a lightweight shoe, it has excellent cushioning in the mid and forefoot – actually the entire foot! Let’s just say, the 21’s delivers when it comes to cushioning! They’re great for short and long runs, and I didn’t feel any fatigue in my feet or calves or any discomfort in my knees or heels.

They are a responsive shoe and give a little bounce that makes them an absolute pleasure to run in. For me, they fit true to size with a decent amount of width in the toe box so there is no pinching or discomfort.

I wanted to wear these shoes for a full month before posting a review on my blog so that I could give you an honest opinion, and after running in them for a month, they’ve been fantastic. I’ve had zero discomfort and as always with my ASICS, I’m impressed with the quality. The Kayano insoles haven’t compressed down at all, and the outer material stands up well to off pavement running.

I’m really honored and proud that ASICS thought of me to review this shoe. It’s kind of strange, but it made me emotional. I just cannot believe how far my little blog has come sometimes. I’m so grateful for these opportunities that it has given me, and I’m so excited for the many more miles that I will run in these shoes and the memories I will create with them!

I am loving my Onyx/Black/Silver pair for fall, but there are tons of color options for the Womens and Mens Kayano 21s!

Looking for a holiday gift for a runner in your family? Get free ground shipping on your ASICS order today and every day!

Evolution Fresh Green Lemonade

Today I’m sharing one of my favorite little afternoon refreshers. I work from home on my computer, surrounded by food, while creating new recipes for my blog, as well as brands that I work with – so sometimes it gets tricky to not eat everything that I make. I will usually sip on a green juice while I’m working in the kitchen to keep myself from shall I say… over sampling recipes, but I’ve noticed that I drink them pretty quickly and then start snacking and munching on the recipes even though I’m not hungry – just out of habit. That’s why I’ve started making green juice ice cubes and enjoying them in fresh lemonade!

When I freeze my fav Evolution Fresh Sweet Greens cold-pressed juice and pour lemonade over it, I sip on it much slower while the green juice cubes defrost into the lemonade and give it a healthier and earthier flavor! It’s really refreshing and it’s a simple way to get a daily dose of greens! It’s also a great way to introduce green juice to kids if you’re looking for ideas!

Evolution-Fresh-Sweet-Greens-Cold-Pressed-Ice-Cube-Lemonade-10
Evolution-Fresh-Sweet-Greens-Cold-Pressed-Ice-Cube-Lemonade-1
Evolution-Fresh-Sweet-Greens-Cold-Pressed-Ice-Cube-Lemonade-2
Evolution-Fresh-Sweet-Greens-Cold-Pressed-Ice-Cube-Lemonade-3
Evolution-Fresh-Sweet-Greens-Cold-Pressed-Ice-Cube-Lemonade-4
Evolution-Fresh-Sweet-Greens-Cold-Pressed-Ice-Cube-Lemonade-5
Evolution-Fresh-Sweet-Greens-Cold-Pressed-Ice-Cube-Lemonade-7
Evolution-Fresh-Sweet-Greens-Cold-Pressed-Ice-Cube-Lemonade-6
Evolution-Fresh-Sweet-Greens-Cold-Pressed-Ice-Cube-Lemonade-8
Evolution-Fresh-Sweet-Greens-Cold-Pressed-Ice-Cube-Lemonade-9
Green Lemonade
Seves 1-2 (if you like sharing!)

1 bottle Evolution Fresh Sweet Greens with Lemon
1 cup RFFMBT Naturally Sweetened Lemonade

Shake Evolution Fresh green juice well. Pour green juice in an ice tray and freeze over night. Fill a glass with ice cubes and then fill to the top with lemonade. Start sipping and enjoy as the green juice starts to defrost into the lemonade. Add lemonade as desired.

RFFMBT Naturally Sweetened Lemonade

6 fresh lemons, juiced
1 teaspoon Liquid Stevia (Lemon Drop Flavor is my favorite for this recipe)
4 cups of water
1 cup ice cubes

Starbucks Holiday Red Cup DIY

I love hearing from winners of my giveaways on RFFMBT. Every time I email a giveaway winner, I always get the most heart warming responses. I love how appreciative and thankful all of my readers are because I’m the same way. It’s the cutest thing when I receive an email from a giveaway winner and they tell me how long they’ve been reading my blog (some of you since the very beginning!) or share their weight loss story or how my blog has inspired them. It seriously makes me smile and makes me want to do more giveaways for you guys because I know you appreciate them.

Just after I announced the winner of my DOLE Salads giveaway, I found out that I won the Starbucks Red Cup Contest! Starbucks held a contest from Nov 1st to the 3rd and asked contestants to submit their “most beautiful and creative red cup moment” with the 2014 holiday cup on Instagram. I had no idea about the contest until the last day when Matt’s sister Olivia texted me and encouraged me to enter. Soooo I whipped up this quick little Starbucks holiday light DIY! The response on Instagram was huge, so I decided to do a little step-by-step DIY for anyone who wants to recreate it!

Starbucks-Holiday-Red-Cup-Christmas-Lights-DIY-19
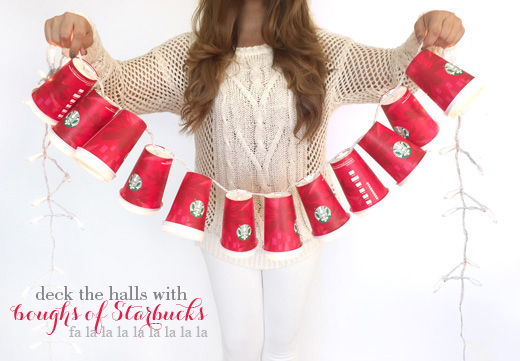
I know it’s not even thanksgiving yet and say “for every set of Christmas lights lit before Thanksgiving, an elf dies,” but I couldn’t resist making these adorable lights! For the sake of the elves, they won’t be lit until after Thanksgiving. #savetheelves

I still can’t believe that with over 11,000 entries for the contest, I won! I am so excited, and cannot wait for my Limited-Edition Sterling Silver Starbucks card to arrive! My favorite part about this, is that I was in Starbucks sipping on an iced sugar-free soy vanilla latte when I got the message that I won! It couldn’t have been more perfect.

I love crafts that allow you to repurpose and recycle things, and this is definitely one of those projects. Instead of throwing away your holiday cups after you finish your gingerbread latte, save them and their lids, rinse ’em out, and deck your halls with boughs of Starbucks!

Starbucks-Holiday-Red-Cup-Christmas-Lights-DIY-11
Starbucks-Holiday-Red-Cup-Christmas-Lights-DIY-1
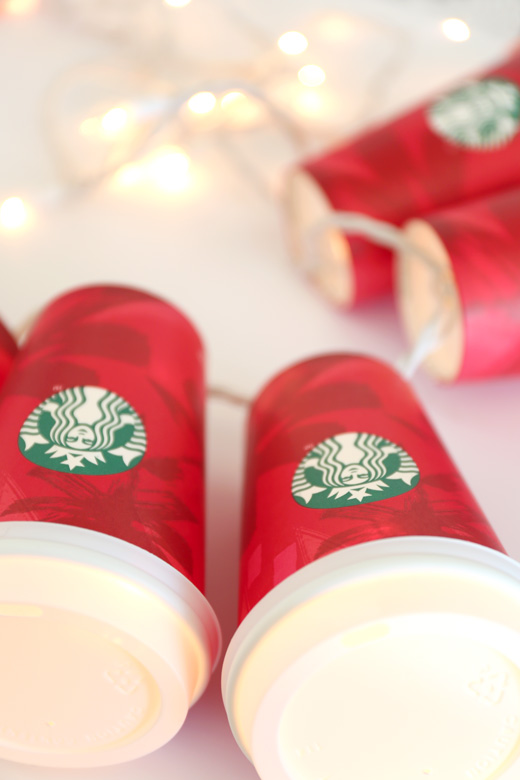
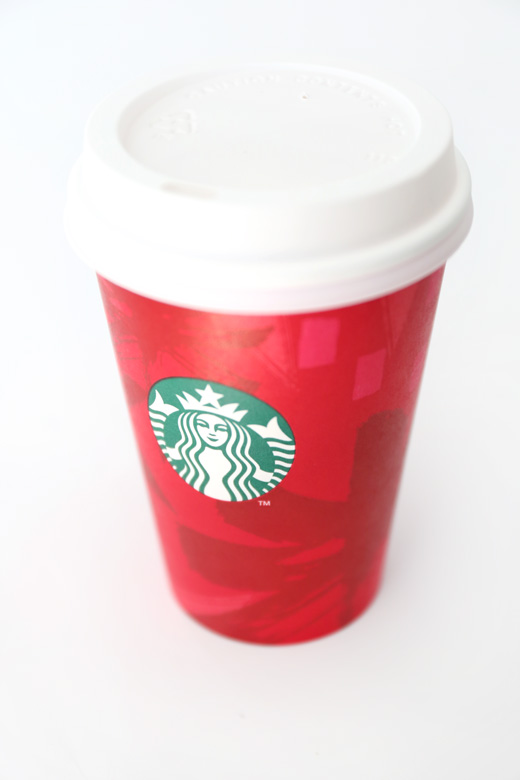
Start saving/collecting tall holiday red cups and lids from Starbucks.

Starbucks-Holiday-Red-Cup-Christmas-Lights-DIY-5
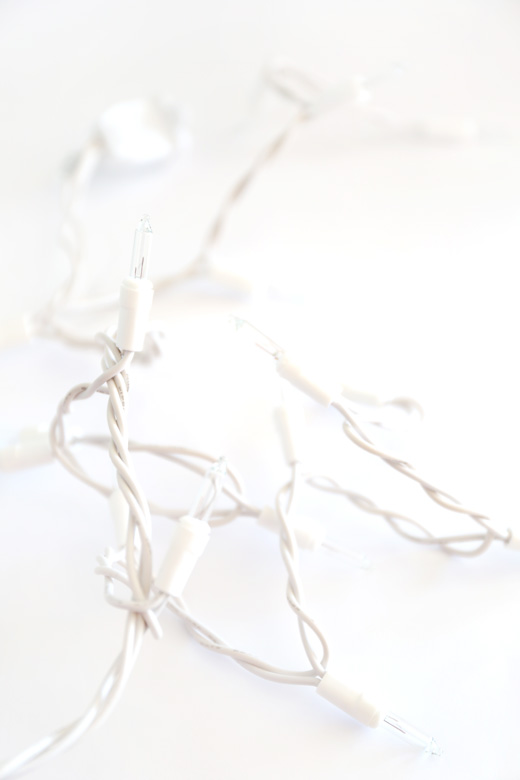
I meant to buy a strand of 50 regular christmas lights but ended up with a strand of 50 icicle lights, which actually worked out better than I though! I opted for white because they match the lids of the Starbucks cups.

Starbucks-Holiday-Red-Cup-Christmas-Lights-DIY-2
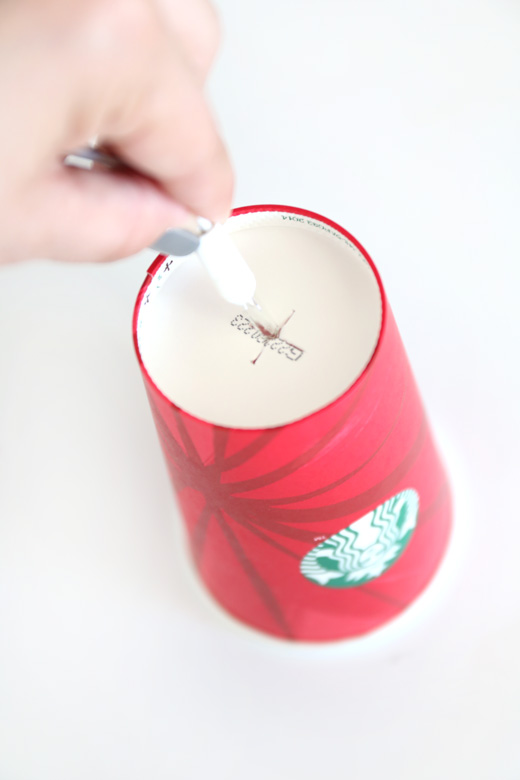
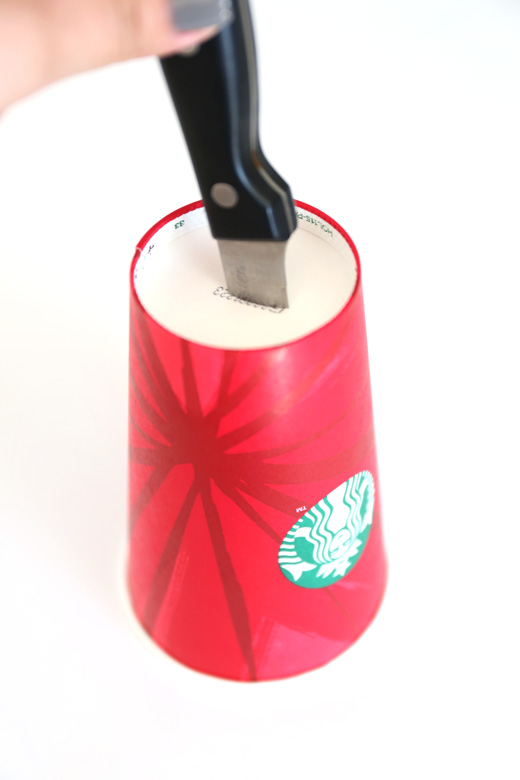
Flip your cups upside-down and carefully make a slit with a sharp knife.

Starbucks-Holiday-Red-Cup-Christmas-Lights-DIY-3Spin the cup around and carefully make a second slit creating an “X” shape.

Starbucks-Holiday-Red-Cup-Christmas-Lights-DIY-4
Starbucks-Holiday-Red-Cup-Christmas-Lights-DIY-6
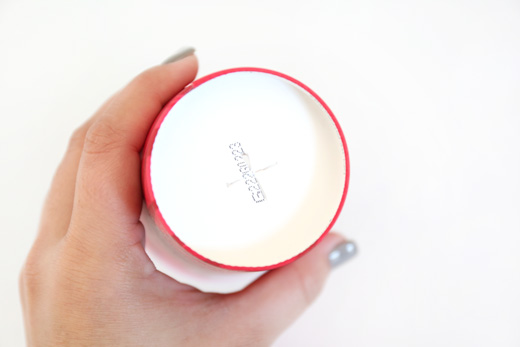
Push the Christmas lights through the bottom of the cup.

Starbucks-Holiday-Red-Cup-Christmas-Lights-DIY-7Pull the remaining lights on the icicle strange through the cup.

Starbucks-Holiday-Red-Cup-Christmas-Lights-DIY-8
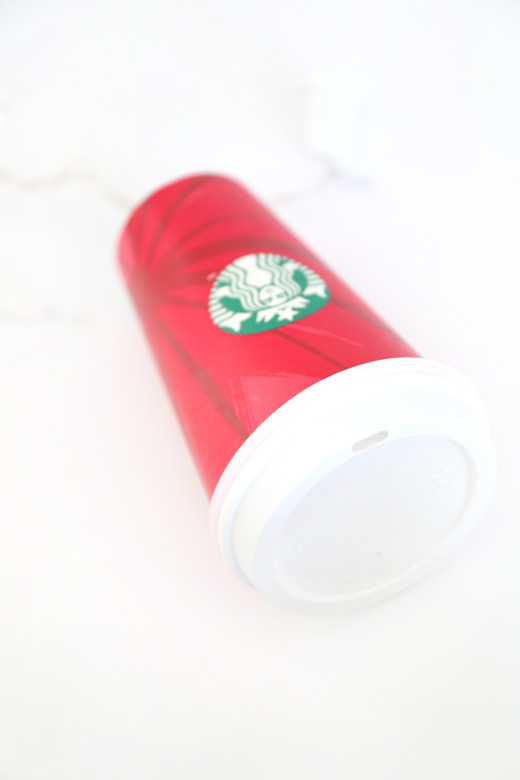
Once the lights have been pulled through and into the cup, close it with the lid.

Starbucks-Holiday-Red-Cup-Christmas-Lights-DIY-9
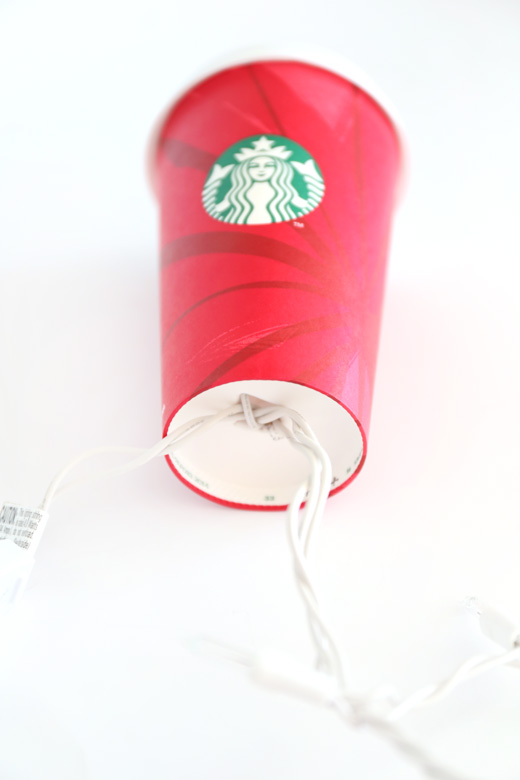
The back end should look like this, with the lights hidden inside. Repeat all of the above steps with each cup.

Starbucks-Holiday-Red-Cup-Christmas-Lights-DIY-12
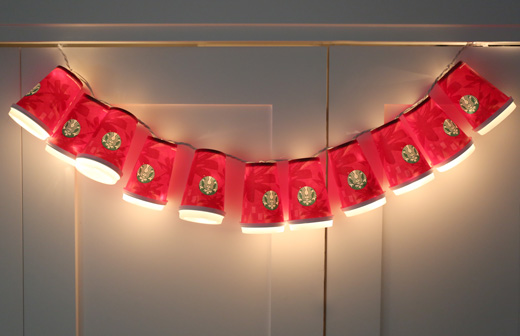
And then voilà, you will have a strand of Starbucks red cup Christmas lights!

Starbucks-Holiday-Red-Cup-Christmas-Lights-DIY-13 *
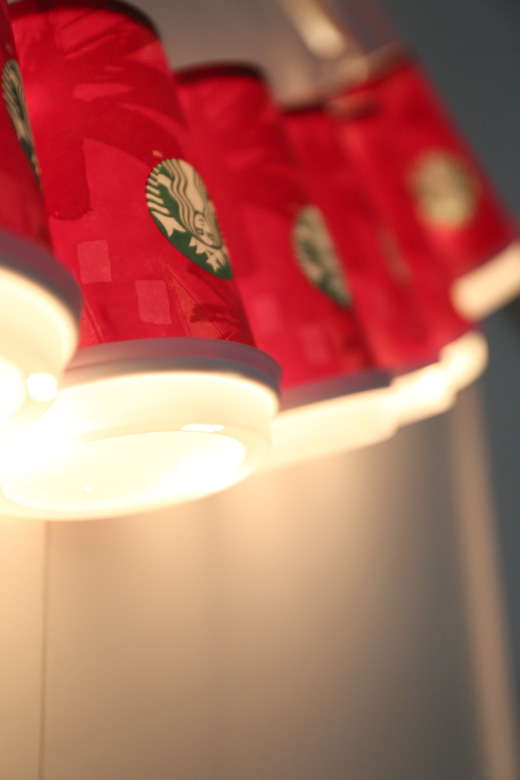
I have only left my red cup lights on for about 10 minutes, so please use caution and keep your eyes on your lights to make sure they are safe and don’t overheat!

Health, Happiness, & Happy Crafting,
xo Catherine

1 8 9 10 11 12 72