healthy

Portobello Pizza

Hoppy Monday all!
Last week I had the opportunity to attend the Bard Valley Natural Delights Medjool Date Summit in yuma, AZ! I had incredible time learning about the harvesting process and taste testing delectable recipes that I MUST share with you guys! I also met some new friends that I already miss since departing on Friday! Wahhhh. I’ll be giving you guys a full rundown of the blogger summit later this week. I cannot wait to tell you about my trip!

Today’s recipe is a Portobello Mushroom Pizza!
Loaded with veggies, this pizza is low-carb, gluten-free, and super filling!
Bon Appétit!
Portobello Pizza 10
Portobello Pizza 9
Portobello Pizza 1
Portobello Pizza 2
Portobello Pizza 3
Portobello Pizza 4
Portobello Pizza 5
Portobello Pizza 6
Portobello Pizza 7
Portobello Pizza
Serves 1

2 large portobello mushrooms
1 tomato
1/4 cup reduced fat mozzarella cheese
1/4 cup chopped onion
1 Tbsp olive oil
1 tsp lemon juice
1/2 tsp minced garlic
pinch of salt
pinch of pepper

Preheat oven to 400 degrees. Chop onion and mince garlic. Pour olive oil into a saucepan over medium high heat and add onions and garlic. Cook onions and garlic until they are slightly browned. Dice tomato and add to the saucepan along with salt, pepper, and lemon juice. Bring the sauce to a simmer and cook for 3-5 minutes. Remove gills from the portobello mushrooms by scraping with a spoon. Place portobellos on a baking sheet coated with nonstick cooking spray. Pour the sauce into each portobello and top with cheese. Bake for 12 minutes. After 12 minutes, set oven to broil for 30 seconds to 1 minute to brown the cheese. Remove from the oven and enjoy!
Tip: I suggest lining your baking sheet with foil and coating the foil with nonstick cooking spray for an easier cleanup. The portobello mushrooms tend to get pretty juicy will cooking!

In a hurry? You can always use organic tomato sauce in place of the homemade sauce! I would recommend about 2 Tbps of store-bought sauce per portobello pizza.

Vegan? Use a vegan cheese substitute such as Daiya Mozzarella Style Shreds!

Portobello Pizza 8
The Rabbit Food Pyramid Breakdown
Produce: portobello mushrooms, tomato, onion, garlic
Whole Grain: none
Protein: reduced fat mozzarella cheese
Plant Based Fat: olive oil

Baked Eggplant Fries

I’ve never been a fan of potato french fries. I’m actually not a fan of potatoes in general, with the exception of the occasional sweet potato. I decided that I wanted to make a healthy french fry alternative with a purpose. No oils, frying, or heavy starchy ingredients here!  These healthy eggplant fries are baked to perfection in a crispy golden flax-almond breading. Now I know what half of you are thinking. “Ewwwww eggplant!” I think a lot of my friends are turned off by the mushy texture of cooked eggplant, but trust me this is totally different! Even if you HATE eggplant, I am almost positive you will love these fries! You have to give them a try, pretty pretty please! Of course if you’re super anti-eggplant, zucchini would be a great alternative as well.

They’re perfectly crispy, delicious, and nutritious!
Made from flaxseed, almond, whole wheat flour, and spices, these oil-free baked fries deliver tons of micronutrients, healthy plant-based fats, and fiber. So good for you, you can eat them alllll without any worry!

Baked Eggplant Fries

Ingredients:
1 small eggplant
1/4 cup egg whites

Breading:
1 Tbsp ground flaxseed
1 Tbsp almond meal/flour
1 Tbsp whole wheat flour
1/2 tsp garlic powder
1/2 tsp onion powder
1/4 tsp cumin
1/4 tsp pepper
pinch of salt

Preheat oven to 400 degrees. Combine all of the breading ingredients in a bowl and mix together. In a separate bowl, beat 1/4 cup of egg whites and set aside. Cut eggplant into 1/2 inch thick fries (I removed the skin but you don’t have to). Transfer the breading mixture to a plate. Dip each piece of eggplant individually into the egg whites, and then roll in the breading mixture. Place the breaded fries onto a baking sheet lined with parchment paper. Bake for 10 minutes, flip fries, then bake for an additional 10 minutes until golden and crispy.

Excellent when dipped in fresh marinara!

Single Serving PB Cookie

Hoppy Fridayyyyy my little bun buns!

A few of you have asked me for more before and after photos because they help you to stay motivated and on track. I searched my computes for quite some time to find old photos, but noticed that I don’t have too many full body pictures of myself. I was usually very covered up or couldn’t stand photos of myself, so I deleted them. Anyways here is another before and after to show you guys what rabbit food can do for your body! I hope that this can inspire you guys to eat more rabbit food!
Before & After
So last week I said that I was going to go prop shopping for my kitchen/blog photos. That semi-happened, but I literally cannot get away from black and white props! It’s my fav! The Coco Chanel kitchen lives on!

I love love love dessert. I get my sweet tooth from my mom, who can literally eat candy and cookies like there’s no tomorrow and maintain her petite frame. I wasn’t blessed with that same gene, but man I love me some sugaaaa! I’m the kind of person that cannot live without dessert or a little something sweet every day. Instead of traditional store bought cookies loaded with oil, salt, refined sugar, and bad saturated fats (not to mention the totally addictive-cannot-stop-eating-one-after-the-other feeling that comes along with them!), I took to my kitchen to give an old fav a healthy spin! I wanted to make a super clean, healthy, peanut butter cookie that can be enjoyed with coffee and good conversation. Something that feels indulgent and naughty, but is actually quite filling and good for you!

Believe it or not, this recipe only calls for 7 ingredients that you probably have in your kitchen already!

Single Serving PB Cookie
Serves 1

1 Tbsp almond flour
1 Tbsp coconut flour
1 Tbsp creamy peanut butter
1 Tbsp unsweetened almond milk
1/2 Tbsp egg whites
1/2 tbsp chocolate chips (or 1 tsp mini)
1 packet stevia

Combine all ingredients in a bowl and mix until well combined. Spread the dough onto a microwave safe plate and flatten into a cookie shape. microwave for 1:15-1:30 minutes.

Single Serving PB Cookie

Red Apple Lipstick Review + Giveaway (CLOSED)

So this giveaway is totally delayed. Ughh, you may have noticed that I had some technical difficulties with my blog last week(end). It was down for a few days, but I’m back in action now! Better late than never, here is that vegan g-free giveaway that I mentioned last week! Since you guys really liked my “What’s in My Makeup Bag” post about natural, vegan, and cruelty-free beauty products, I decided it would be fun to introduce you to a new vegan, gluten-free makeup brand that I am absolutely in love with!

You are going to love this lipstick: here’s why!

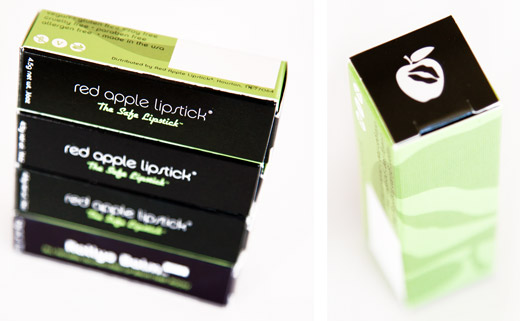
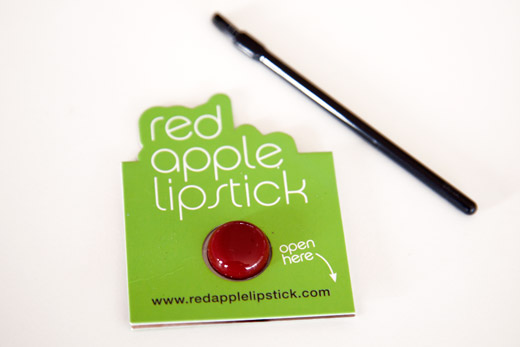
Red Apple Lipstick is not your ordinary lipstick company. Sure, they have a wide array of gorgeous colors, but that’s not all. Red Apple Lipsticks and glosses are vegan, and lab tested free of gluten, parabens, toxins, and soy. They are also enriched with a gluten-free source of Vitamin E for awesome, all-day moisture! Red Apple Lipstick delivers natural lip products with long-lasting wearability, vibrant colors, and nourishing ingredients, made in the USA!

Red Apple Lipstick

This is the creamiest mineral lipstick I have ever tried! They really mean what they say by “all-day moisture!” With most drugstore lipsticks my lips get really dry after the first hour and I end up scrubbing the color off and applying a tinted chapstick, but that was not the case with Red Apple Lipstick. I was pleasantly surprised as to how smooth and moisturized my lips felt. Before applying the lip color, I exfoliated my lips with the Lip Exfoliator Stick and applied the Rallye Balm throughout the day. When it came time to do my makeup and apply my lipstick, it glided on like butter and stayed put! I am a huge fan of how opaque and pigmented the color was once applied compared to other mineral-based lipsticks. Most require layers of building color, but Red Apple Lipstick went on perfectly.

Red Apple Lipstick is an excellent choice for anyone who has gluten sensitivity or Celiac Disease.
It’s a fact that ladies with Celiac Disease, or even a mild intolerance to gluten battle dry, chapped lips constantly. No lipstick should do harm to your delicate lips! Did you know your lips are only 4 dermal layers thick… compared to your thigh which is 16 dermal layers? No wonder they chap so easy! And when something upsets the natural balance in your lips, the damage is multiplied!

Red Apple Lipstick 4
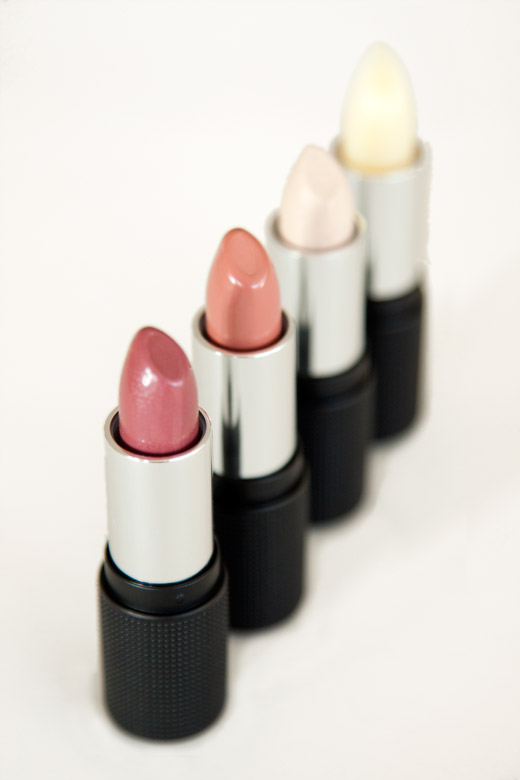
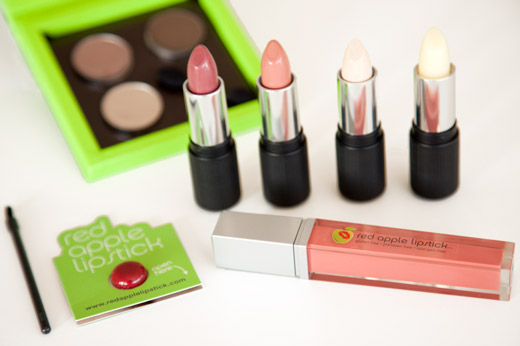
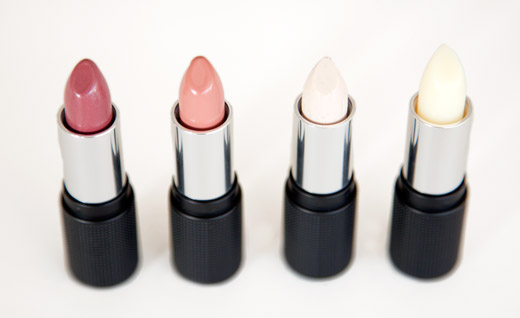
Red Apple Lipsticks in Vogue and New York followed by the Exfoliator Stick, and Rallye Balm.

Red Apple Lipstick 8
Red Apple Lipstick 2Red Apple Lipstick Gloss in Nude Peppermint.

Red Apple Lipstick 5
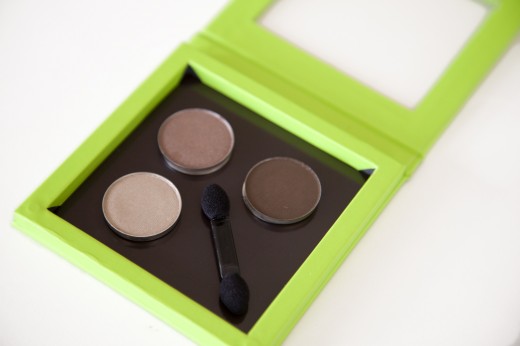
Red Apple Lipstick was also kind enough to send me a custom Eyeshadow Palette with Z-Palette Magnetic Eye Shadow Holder and three gorgeous natural browns Champagne E7, Twinkle Taupe E10, and Espresso E6.

Red Apple Lipstick 7Are you a member of the Red Apple Lipstick VIP Club?
Be sure to sign up for the free VIP Club email list to get 20% off codes each month!
That means never paying full price for RAL – EVER!
Your first code will arrive instantly after you sign up : )

Red Apple Lipstick 3Want to try Red Apple Lipstick, but not sure if you’ll love the color? Another thing that I love about RAL is that you can purchase samples of colors to try before buying a full size lipstick!

Red Apple Lipstick in Rebel
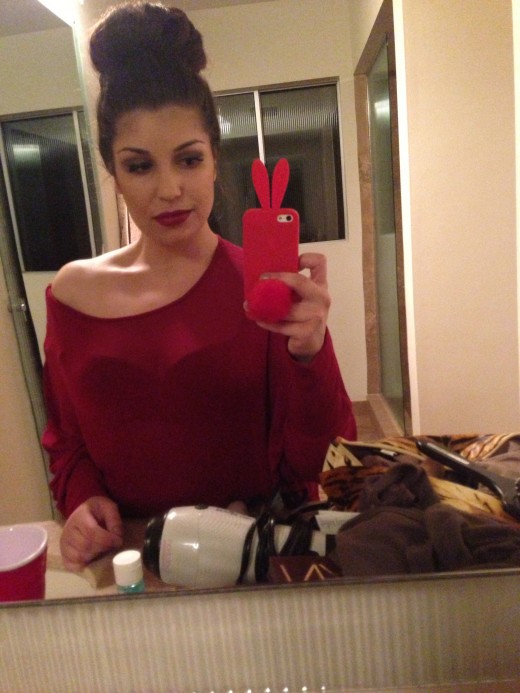
Me wearing Red Apple Lipstick in “Rebel!”

Red Apple Lipstick 9
Here’s your chance to win some Red Apple Lipstick cosmetics (worth $130!).
Red Apple Lipstick prize pack includes: “Vogue” lipstick, “New York” lipstick, “Nude Peppermint” gloss, Exfoliator Stick, Rallye Balm, “Rebel” sample color and applicator brush, and Z-Palette Magnetic Eye Shadow Holder with “Champagne E7,” “Twinkle Taupe E10,” and “Espresso E6” eyeshadows.

For your chance to win:
1. Comment on this post telling me what your favorite natural beauty product or remedy is.

2. Tweet ” Enter to win #glutenfree #vegan @RedAppleLipstic #cosmetics from @EatRabbitFood http://bit.ly/14AOnow ”
– To complete your Twitter entry, leave a separate comment with the url to your tweet!

2. Post a photo on Instagram of your favorite beauty product with the IG handle @RabbitFoodForMyBunnyTeeth and hashtag #RFFMBTredapple
– To complete your Instagram entry, leave a separate comment with the url to your Instagram photo!

This means you can earn up to 3 entries!
Contest ends Tuesday, September 10th at 11:59pm PST.
Winner will be announced Wednesday, September 11th.
Must use a valid email address when entering. Open to U.S. residents only.

Cinnamon Raisin Breakfast Quinoa

I’m so excited to be home and back to creating new recipes for you guys! I know that’s why you’re here visiting my blog anyways : ). I think that my favorite meal of the day is breakfast, and since I often get bored of the same breakfast over and over again, I’m always creating new things. Today’s recipe is a similar to traditional oatmeal, but instead using quinoa as the whole grain. Nutritionally renowned for its protein content, quinoa makes an excellent addition for vegan and vegetarian dishes. But it’s not just the protein content that is so special, it’s the type of protein. Quinoa contains the perfect balance of all nine essential amino acids! No wonder it’s considered a “superfood!”

I am in desperate need of some new props for my blog! I realized that I don’t have any fun bowls or utensils since my kitchen is all black and white. I like to call it the Chanel kitchen haha. Time to add some color! Prop shopping will be happening this weekend. For now, my favorite cow creamer is making his debut!

Cinnamon Raisin Breakfast Quinoa
Serves 1

1/2 cup unsweetened almond milk (or nonfat dairy milk)
1/4 cup dry uncooked quinoa
1/4 cup raisins
2 Tbsp sliced almonds
1/2 tsp vanilla
1/4 tsp cinnamon

Combine milk, vanilla, cinnamon, and quinoa in a small saucepan. Bring the mixture to a boil. Once it reaches a boil, lower heat and cover for 10-15 minutes until the milk has been soaked up. While quinoa is cooking, place raisins in a small bowl of water and let them soak. After quinoa has finished cooking, strain the plump raisins from water and add to quinoa along with the almonds. Serve hot.
Note: I think the light sweetness of the raisins is perfect with the quinoa, but if you like a sweeter breakfast you can add half a tablespoon of agave or honey to the quinoa and milk while it’s cooking.

Cinnamon Raisin Breakfast Quinoa
The Rabbit Food Pyramid Breakdown
Produce: raisins
Whole Grain: quinoa
Protein: milk
Plant Based Fat: almonds

1 2 3 4 5 18